No doubt, you always expect professional photographers to click excellent photos that capture the mood of the moment and have no blemishes on them. [Read more…] about Movavi Photo Editor Review (Mac & Windows): How Good Is It?
NewspacePhoto.Org
No doubt, you always expect professional photographers to click excellent photos that capture the mood of the moment and have no blemishes on them. [Read more…] about Movavi Photo Editor Review (Mac & Windows): How Good Is It?
Although I am a professional reviewer of cybersecurity programs, I love photography too. I really wish I had the ability to click photographs like professionals. Unfortunately, I have extremely limited ideas about aperture and shutter speed settings. [Read more…] about Photolemur 3 vs. Perfectly Clear – The Better Alternative
Visit Photolemur Visit Luminar
Although writing about programs is my primary interest, I am fascinated with photography too. I love taking photographs of nature with my digital SLR camera.
Fortunately, you no longer need to choose between these two programs as the vendor has fused them into one program. Photolemur no longer exists. It has now been combined into the new Luminar Neo.
You may read further if you want to know what Photolemur was like in its days.
Unfortunately, despite my best effects and the fact that digital cameras take away a lot of the guesswork and settings associated with their manual cousins, I always struggle to take the best quality photographs.
It would, no doubt, be amazing if I had access to software that provided me with the opportunity to retouch my photographs to improve their quality.
One of my friends suggested that I should try either Photolemur or Luminar Neo.
After having tried both the programs, I decided to write this updated Photolemur vs Luminar Neo review to help budding photographers understand the features of both of these photograph enhancement programs and determine if the new Luminar Neo would still suit their needs when compared to the then Photolemur.
Before I proceeded with this Photolemur versus Luminar Neo review, I pointed out that software developers are including “artificial intelligence” in their programs. These two programs are no exceptions, even though Luminar Neo is a newer and more advanced release by the same vendor.
These two photo-retouching software are so simple to use that even those who have never used such programs before will feel at ease after using them for a couple of hours.
I found out that both programs drastically cut down the learning curve typically associated with photo retouching programs. Let me now explain the features of both these software along with their prices, merits, and demerits.
The index page of the vendor of this program stated that Photolemur spares you the costs of purchasing an expensive program and the headache of spending hours with it to perfect your images. Thanks to its auto-editing feature.
It further stated that the program used artificial intelligence for the job and the user only had to drag and drop their images on the application and let technology complete the job of retouching their photographs.
Unlike other high-end programs that are mostly subscription-based, Photolemur was available for a one-time purchase. It worked on both the Windows and Mac operating systems as a one-time, subscription-free purchase.
The one-off subscription costs were $35 for a single license and $55 for a family license which allowed five persons to use this program.
You could also purchase three different add-ons (styles) including:
• Rich: Perfect for enhancing wedding photos, glamorous looks (I believe this means photographs of models), and fashion photography
• Fusion: Ideal for enhancing party photographs, nightlife shots, and street photographs
• Impress: Perfect for enhancing landscape photographs taken while traveling, early morning shots, as well as for sunset skies
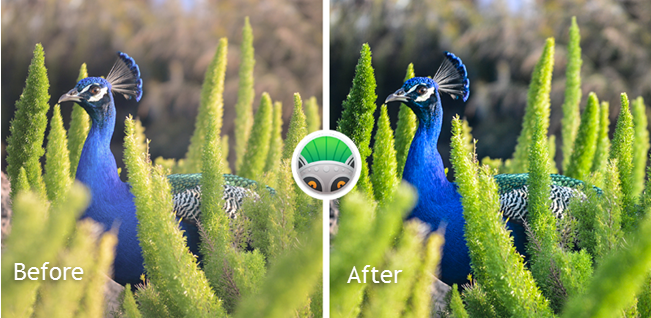
I was impressed by the fact that the website of the vendor allowed you to see how images looked before and after being processed by Photolemur by sliding a vertical bar to the left and right respectively.
This program offered the following filters:
• Sky enhancement
• Color recovery
• Exposure compensation
• Foliage enhancement, and
• RAW processing
In addition, you could change the color, saturation, and hue of your photographs with the help of the following styles, similar to Instagram filters, and were available in version 3 of the program:
• Apollo
• Evolve
• Fall
• Mono
• Noble, and
• Spirited
On the one hand, this program was designed and targeted at novice photographers who lacked the knowledge needed for making custom photo edits.
On the other hand, professional photographers who hardly had the time to edit each photograph manually could also depend on it.
This software supported batch processing and had the option for processing RAW (an unprocessed photograph captured by the digital camera's sensor, and saved in the proprietary format, specific to the manufacturer of the camera) formats too.
During this Photolemur 3 vs Luminar Neo review, I feel it is important to point out that the “artificial intelligence” (AI) incorporated with Photolemur, took away the headache of manual editing as the software figured out all the decisions required and implemented them to produce excellent quality photographs.
Thanks to its “AI,” this program while processing different types of photographs, was able to understand the different types of images processed and distinguished between different objects in the images such as mountains, foliage, buildings, faces, and people so that it could edit them appropriately.
The program received several updates after Skylum purchased it. This made its artificial intelligence engine even more powerful.
Version 3 included a powerful cloud-based batch image editing feature. You did not need to worry if you did not have a fast computer, as all of the images are processed by the cloud servers of Skylum.
The additional features included in version 3 were:
• Automatic face enhancement
• Photolemur styles
• Export to SmugMug (was available only on the Mac platform)
• Batch processing (allowed you to apply facial retouch, styles, and boost to a batch of images)
• Improved performance… the vendor had implemented improvements to boost the stability and speed of the program along with its AI batch processing engine.
The new version of this software concentrated on portrait photo editing. This, combined with its batch image processing feature, which also allowed you to include one of the different styles provided to a batch of images quickly and flawlessly, made Photolemur stand apart from competitors, only improved upon in Luminar Neo.
Using the program was extremely simple. There were not a host of features in its interface. On launching the program, you would be presented with a small window that had a couple of options to load images.
On the one hand, you could load a new image on the program using the file browser, and on the other hand, you could drag and drop photographs on the screen.
Once the image is loaded, the interface is expanded to accommodate the image aspect ratio. However, the program did not have the option to zoom in or go full screen.
If you were using this program for the first time and did not have the image you wanted to process available on your computer's hard disk drive, you just needed to have selected the “open sample image” option.
Version 3 of Photolemur supported .png, .tiff, .jpeg, and raw image formats of various sizes in pixels.
You would find just a limited set of options for processing photographs. This was because its AI engine handled all the tasks automatically. You needed to wait for some time to see the final edited version of your image. You would also see the vertical before/after slider, mentioned above, which you could use to compare the original photograph with the processed one.
If you were satisfied with the results, you only needed to have clicked on the “export” button.
Alternatively, you had the option to click on the “brush” icon to adjust the intensity of the processed effect. The included “style” feature consisted of Instagram-like filters you could apply to your images once the AI enhancement had done its work.
Photo editing and enhancement had been taken to a higher level with AI (Artificial Intelligence) as exhibited in this amazing software. This review sheds more light on Photolemur as it was a time saver for both the photo editing novice and the expert. Put the pictures there and let it do the work for you.
Offered by the same vendor, Skylum, I expected Luminar Neo to have nearly identical features to Photolemur. Therefore, I was not surprised by the vertical slider feature displayed on the home page of this program.
However, I also noticed many other options in its menu, which allowed me to individually tweak settings as per my preference.
The vendor has included the “libraries” function, which changes it from being a single image editor to a photo workflow application.
Unlike the previous versions, in which you had to open an image, edit it, and save it after each major edit, you just have to click on an image to load it.
The software saves your work automatically as you keep on editing it. This means that you can focus all your attention on the editing aspect.
The implementation of the current library consists of a combination of a database and a file browser. You can add folders to the library, and the software will scan them and create thumbnails for browsing.
As the folders are synced with your computer's hard disk drive, Luminar Neo reflects updates when you make changes in the Windows Explorer or Finder (for Macintosh-based computers). The software does not regenerate thumbnails from RAW files. Your sole option to bypass this issue is to load the RAW files by switching to the edit tab.
While I found that .jpeg files loaded extremely fast in the edit interface of Luminar Neo, it takes a bit longer for RAW files to load. According to me, the program loads RAW images in different stages. Initially, it displays the embedded preview, followed by a cached, low-resolution preview, and finally the full-resolution image.
You can start editing the image after the second stage. If you have applied filters such as “distortion correction” you can only edit the image after it loads fully.
Luminar Neo has a somewhat basic view, which does not permit you to view the file type… you have to switch on the info panel for this. This can be frustrating if you are editing a combination of .jpeg and RAW images as they both appear beside each other in “catalog view” mode.
This program is available in a standalone version as well as plugins for “Adobe Photoshop,” “Adobe LR,” and “Apple Photos” extensions.
Like Photolemur, Luminar Neo, too, is available for Windows and Macintosh-based operating systems and is not subscription-based.
There is an option to choose between getting a license for 1 PC and 2 PCs with varying prices for each, respectively.
This is the only photo-enhancing software I have seen that provides you with different modules for enhancing different types of images such as:
• Aerial
• Professional
• Quick & Awesome
• Landscape, and
• Portrait
Each of these options has its individual preference. For example, the “Aerial” mode is the best for enhancing drone photographs.
The “Professional” mode contains all the essential tools that professional photographers need like RAW development, advanced contrast, dehaze, and much more.
Novice photography enthusiasts will love the “quick & awesome” feature, as it provides three sliders for changing the saturation and clarity of an image and also boasts of the unique Accent AI of Skylum. You can also use the power of artificial intelligence to:
Add realistic sun rays to your photograph
Change the sky in your images to make them look incredible
Automatically analyze your photographs and apply suitable enhancements
I also loved the way Luminar Neo organizes photographs by day, month, and year, allowing you to quickly access and view any images in each category in the program's library.
Another amazing feature is the ability to apply a specific and personalized enhancement to different images. Enhance one image.
Once satisfied, select other photographs you would like to add the same enhancement to. The software immediately adds that enhancement to all selected photographs. This is a great time saver.
Like Photolemur, Luminar Neo also saves edits automatically. This helps to save time as you edit.
I did not like the way the software added the “lens distortion” effect to RAW files whenever I opened them for editing. You can manually turn it off each time you do not want this feature to be applied, as there is no option to disable this feature from within the software settings at the time of writing this article.
Another bother is the inability to change the size of the thumbnails apart from the default small, medium, large, and largest presets. Thumbnail generation is too slow and takes roughly 10 seconds to complete the preview.
Photographers often ask me about my views as to which photo enhancer is better based on my evaluation and comparison. I am sorry to dismay those who ask: “is Luminar Neo better than Photolemur?”.
No doubt the former has some excellent options, but it all boils down to your needs in particular as they both have great features.
Both Luminar Neo and Photolemur offer you the possibility of getting single or multiple licenses.
In this review on Photolemur compared to Luminar Neo, I'd like to point out that Skylum, the company that owns both these photo enhancement programs, has done well by incorporating into Luminar Neo great tools that also let it function as a plugin to other programs.
They have even taken everything a notch higher in Luminar Neo which comes with faster and more efficient artificial intelligence.
Like Photolemur, Luminar Neo can also batch-process multiple images and folders quickly.
To sum it up, my answer for those who ask: “is Photolemur better than Luminar Neo?” is that it depends on your needs and level of experience.
Photolemur was ideal for people who had no time or who were busy. It would use its artificial intelligence (AI) to automatically improve photos with very advanced algorithms while Luminar Neo has more editing workflows for more advanced users in terms of editing and organization of photographs.
If you are looking for an easy-to-use photo enhancer or editor for some not-too-serious editing, you may have used Photolemur. But if you care about the nitty-gritty, then you may opt for Luminar Neo.
NOTE: If you need to use Luminar Neo as a plugin, you do not need Luminar Flex as this new version can already be used as a plugin itself. It has been developed to work with Adobe Photoshop, Photoshop Elements, Apple Aperture, macOS photos, and Adobe LR.
Luminar Neo is good, but if you do not have the time or money to invest, Photolemur would have been an option to make your pictures great automatically. All you needed to do was just drag and drop your pictures and the software would do the rest with superior Artificial Intelligence.
However, if you are a heavy user and are into some serious photography work, then Luminar Neo will do.
Agreed, an amateur cannot and should not be expected to take perfectly framed photographs like an expert, even if they have the best DSLR camera.
Attention – Photolemur is now the new and improved Luminar Neo.
The professional has the experience, which allows him to select the best angles, a trained eye that allows him to frame the subject quickly, and knowledge about ambient lighting conditions that allow him to constantly shoot the best photographs.
However, amateurs have another handicap: lack of experience, which does not allow them to set the correct speed and aperture settings, resulting in dull photographs.
Using photo retouching online sites is not ideal, as most of these sites do not provide various settings such as noise cancellation, color, hue, saturation adjustment, and many more, required to breathe life into a lifeless picture. [Read more…] about Photolemur 3.0 Review – Is There a New Version?