Want to know how to easily share clips?
Look no further!
In this article, we'll show you the quickest and simplest ways to share your favorite clips with friends and family.
Whether you're using YouTube, X platform, Apple Clips, or even your iPhone, we've got you covered.
Learn how to create, disable, and share clips effortlessly, and make sure you never miss out on sharing those unforgettable moments again.
Let's get started!
Key Takeaways
• The process of creating and sharing clips on YouTube and X involves selecting start and end points, adding titles and descriptions, and copying the link to share on social media, chat, or email.
• When watching live videos on X, users can engage with other viewers in real-time, like and comment on the content, discover new content, and connect with like-minded individuals.
• Disabling viewer clipping on X can help protect copyrighted material and maintain content integrity by preventing viewers from clipping and sharing specific parts of videos.
• Enabling automatic video looping and downloading on X allows users to captivate viewers and unleash creativity by playing videos without repeating and downloading them for offline access.
YouTube's ‘Clips' Feature
To use YouTube's ‘Clips' feature, you'll need to follow these simple steps.
First, open your YouTube Studio dashboard. From there, navigate to the video you want to create clips from.
Once you've selected the video, you can create clips. This should open up the ‘Clips' editor where you can easily create and customize your clips.
In the ‘Clips' editor, you'll find a timeline of your video along with various tools and options.
To create a clip, simply drag the sliders to select the desired start and end points of the clip.
You can also add a title and description to each clip to make it more informative and engaging.
Once you're satisfied with your clip, you can go ahead to create it. YouTube will then process the clip and make it available for sharing.
You can share the clip directly from the ‘Clips' editor by clicking on the ‘Share' button.
With the ‘Clips' feature, sharing highlights from your YouTube videos has never been easier.
Whether it's a funny moment, a tutorial snippet, or an exciting scene, you can now capture and share the best moments of your videos with your audience.
Testing Clipping Yourself
If you want to test clipping yourself, simply follow these steps:
• Open the original video that you want to create clips from.
• Look for the clip button, usually located below the video player.
• Start creating clips.
• Set the start and end points of the clip by dragging the markers on the video timeline.

• Give your clip a title and a brief description to make it more engaging.
• Add any necessary tags or hashtags to help others discover your clip.
• Once you're satisfied with the clip, click on the share button to generate a unique link.
• Share the clip with your friends, and followers, or on your social media platforms.
Testing clipping yourself allows you to experience the process of creating clips firsthand.
It gives you a chance to explore the different features and options available, ensuring that you understand how to share a clip effectively.
By following these steps, you can become more proficient in creating clips from live videos and sharing them with others.
Now that you know how to test clipping yourself, we will take a look at watching live videos on various platforms.
Watching Live Videos on X
To watch live videos on X, simply navigate to the platform and select the desired video to start streaming.
X is a popular social network that allows users to connect with friends, follow their favorite creators, and explore a wide range of content, including videos and live streams.
Whether you're interested in watching live gaming sessions, music performances, or educational talks, X offers a diverse selection of live videos to suit your interests.
Once you've found a live video that catches your attention, simply click on it to start watching. X provides a user-friendly interface that makes it easy to navigate and interact with the video.
You can like, comment, and engage with other viewers in real-time, creating a sense of community and connection.
Watching live videos on X isn't only entertaining but also provides an opportunity to discover new content and connect with like-minded individuals.
So, sit back, relax, and enjoy the immersive experience of watching live videos on X.
Now that you know how to watch live videos on X, let's move on to the next section:
Creating and Sharing a Clip on X.
Step 1:
- Tap the camera icon or swipe left from the timeline to access the camera.
- Hold down the capture icon to record a video.
- Optionally, you can add a post copy and a location.
- Tap “Post” when you're ready to post the video, or tap “Add to thread” to connect it to your last post, and then press “Add” to share it.
Step 2:
- Tap the Tweet icon to take or upload a video to add to your thoughts.
- Below the compose box, you'll see quick selection options to add a new video. Your most recent videos from your gallery will appear as thumbnail previews.
- Tap the camera icon to take a video.
- Trim the length of your video by dragging either side of the bar at the bottom. The maximum video length is 2 minutes and 20 seconds.
- Tap “Trim” to finish editing your video. You can preview it by tapping the play button before posting.
- Tap “Post” to share your video.
To share and publish a video through the internet:
- Click the post button or utilize the compose box.
- Click on the button displaying the gallery.
- Please, select a video file from your computer and click ‘Open‘. If the format of the video is not supported, you will receive a prompt.
- The limit for postVideo file size is set at 512MB, but worry not, as you can effortlessly upload videos exceeding 2 minutes and 20 seconds in duration and effortlessly trim them before adding them to a post.
- Click ‘Post‘ to share your message and video after completing it.
Disabling Viewer Clipping
To disable viewer clipping on X, you can navigate to the settings menu and adjust the relevant options.
Disabling viewer clipping allows creators to have more control over their content and prevents viewers from clipping and sharing specific parts of their videos. This feature is particularly useful for creators who want to protect copyrighted material or maintain the integrity of their content.
When viewer clipping is disabled, viewers will no longer see the ‘Share Clip' button while watching a video. This means that they won't be able to create and share clips of the video directly from the platform.
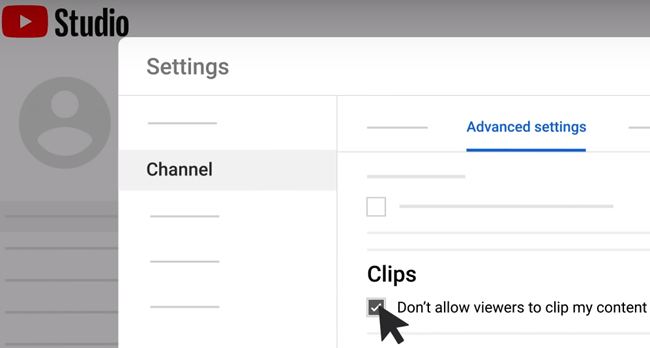
To disable clipping on YouTube, you will have to get to the advanced settings (under settings) and check the box that says, “Don't allow viewers to clip my content”.
However, it's important to note that disabling viewer clipping doesn't prevent viewers from sharing the entire video using the ‘Share' feature.
To disable viewer clipping, go to the settings menu and look for the ‘Disable Viewer Clipping' option.
Once you've found it, simply toggle the switch to turn it on.
After disabling viewer clipping, viewers will no longer be able to create clips of your videos.
Managing Your Clips
Managing your clips is an important task to ensure that you have easy access to them and can share them with others effortlessly.
Here are some key points to keep in mind when managing your clips:
• Organize your clips: Create folders or categories to organize your clips based on different topics or projects. This will help you find specific clips more quickly and efficiently.
• Edit your clips: Use editing tools to trim or enhance your clips before sharing them. This can include cropping out unnecessary parts or adding captions to make them more informative.
• Utilize clipboard-related topics: Take advantage of clipboard-related topics to explore different ways to use your clips. These topics can provide inspiration and new ideas for utilizing your clips in creative ways.
By following these tips, you can effectively manage your clips and make the most out of the sharing feature.
Remember to select settings that suit your preferences and allow you to easily share your clips with others. With proper content management, your clips can become valuable assets that you can use for various purposes.
Automatic Video Looping on X
Now let's explore how you can enable automatic video looping on X, allowing you to seamlessly repeat your clips without interruption.
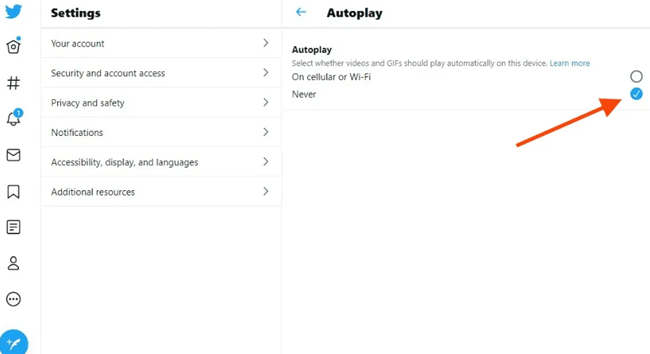
X provides a convenient feature that automatically loops your videos, ensuring a continuous playback experience.
To enable this feature, follow these simple steps:
1. Open the X app on your device.
2. Navigate to the video you want to loop.
3. Tap on the loop icon, usually represented by circular arrows or an infinity symbol.
Once enabled, your video will automatically restart once it reaches the end, creating an infinite loop. This is perfect for creating mesmerizing visuals or showcasing important moments in your clips.
To disable automatic video looping, tap the loop icon again, and your video will play through without repeating.
Here is a table summarizing the steps to enable automatic video looping on X:
With automatic video looping on X, you can effortlessly create captivating content that keeps your viewers engaged.
You can experiment with looping your videos and unleash your creativity.
Video Downloads on X

To download videos on X, follow these simple steps:
• Ensure web access: Make sure you have a stable internet connection to download videos from X. Without web access, you won't be able to retrieve the video files.
• Locate the video: Find the video you want to download on X. It could be a clip you want to share with others or a video you want to keep for offline viewing.
• Click the download button: Look for the download button beneath the video player on X. It's usually represented by a downward-facing arrow or a cloud icon. Click on it to initiate the download process.
• Choose the download format: X may offer different download formats for the video. Select the format that suits your needs, such as MP4 or AVI.
• Wait for the download to complete: Depending on your internet connection speed and the size of the video, the download may take some time. Be patient and wait for the download to finish.
• Access the downloaded video: Once the download is complete, you can find the video in your device's designated download folder. From there, you can share the downloaded video with others or enjoy it offline at your convenience.
Sharing Video Clips

To share video clips with others, simply follow these steps.
First, make sure you have the full video clip ready to share.
Next, choose a platform or method to share your clips. One popular option is to use social media platforms like Facebook or Instagram. These platforms allow you to upload your video clip and share it with your followers or friends.
Another option is to use video-sharing websites such as YouTube or Vimeo. These websites allow you to upload your full video and provide you with an embedded link that you can share with others.
Additionally, you can use messaging apps like WhatsApp or Telegram to quickly share your clips with specific contacts. Simply select the video clip from your device and send it through the app.
Remember, when sharing video clips, it's important to consider the privacy settings and preferences of both yourself and the recipients.
Sharing Apple Clips

Let's now take a look at how you can share Apple Clips.
With Apple Clips, sharing your favorite moments with friends and family is made easy.
Here are three ways you can share your Apple Clips on your iPhone:
• Directly to social media: Apple Clips allows you to share your clips directly to popular social media platforms like Facebook, Instagram, and YouTube. Simply select the clip you want to share, tap on the share button, choose the social media platform, and add any captions or tags before posting.
• Send via Messages: If you prefer a more personal touch, you can share your Apple Clips directly with individuals through the Messages app. Tap the share button, select Messages, choose the recipient, and send the clip as a message. Your recipient can then view the clip and respond directly within the Messages app.
• Save to your Photos app: Another option is to save your Apple Clips to your iPhone's Photos app. This allows you to keep a collection of your clips and share them later through various channels, such as email or cloud storage platforms like iCloud or Google Drive.
With these simple steps, sharing your Apple Clips has never been easier. You can capture those precious moments, and share them with the world using Apple Clips on your iPhone.
Sharing YouTube Clips

Sharing your favorite videos or clips from your own channel is a great way to engage with your audience and spread your content.
Here's how you can do it:
1. Find the video you want to share on YouTube.
2. Click on the “Share” button located below the video player.
3. A sharing panel will appear with various options for sharing the video.
4. Choose the platform or method you want to use to share the clip, such as social media, email, or embedding it on a website.
Remember, when you share a YouTube clip, it will direct viewers to the original video on YouTube.
This means that if the video has been uploaded to someone else's channel, viewers will be directed to that channel to watch the clip. If it's from your own channel, viewers will be directed to your channel, which can help increase your visibility and subscribers.
Sending Video Clips on an iPhone
Now, let's delve into how you can easily send video clips on an iPhone.
Sending video clips on your iPhone is a breeze, and there are multiple ways to do it. A few of the ways to do this are as follows:
• Using Messages: The Messages app on your iPhone allows you to send video clips directly to your contacts. Simply open the Messages app, select the contact you want to send the video to, tap on the camera icon, and choose the video clip you want to share from your camera roll or gallery.
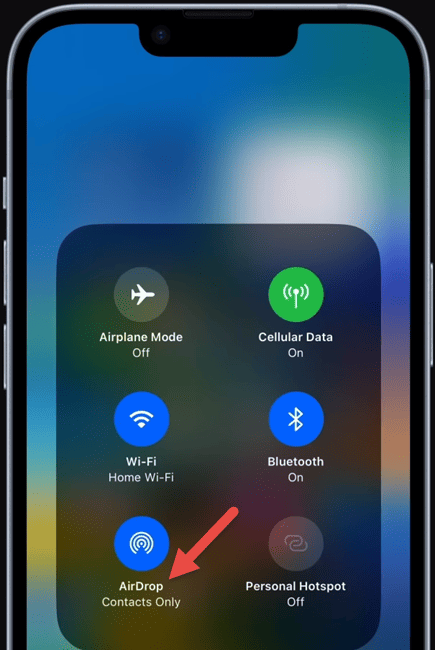
• Using AirDrop: AirDrop is a great feature that allows you to wirelessly share files, including video clips, between Apple devices. To send a video clip using AirDrop, open the Photos app, select the video clip you want to share, tap the share icon, and choose the AirDrop option. Then, select the device you want to send the video clip to and confirm the transfer.
• Using third-party apps: There are several third-party apps available on the App Store that are specifically designed for sharing video clips. These apps often offer additional features like video editing and social sharing options. Simply download the app, follow the instructions to set it up, and start sharing your video clips with ease.
With these simple methods, you can easily share video clips from your iPhone with your friends, family, or colleagues.
Whether it's through Messages, AirDrop, or third-party apps, sharing your favorite moments has never been easier. You can start sharing those amazing video clips with the world!
Frequently Asked Questions
How Can I Customize the Length of the Clips I Create on YouTube?
Want to customize the length of your YouTube clips?
It's easy!
Simply adjust the settings before uploading. Don't worry, you won't be limited by default durations. Create and share exactly what you want.
Can I Clip Multiple Sections from a Single Video on X?
Yes, you can clip multiple sections from a single video on X. It's a convenient feature that allows you to easily share specific moments without having to share the entire video.
Is There a Limit to the Number of Clips I Can Create and Manage on X?
You can create and manage as many clips as you want on X. There is no limit to the number of clips you can make.
Can I Download Clips Created by Other Users on X?

Yes, you can download clips created by other users on X. It's a great way to share and collaborate. Simply find the clip you want, click the download button, and it's yours to use.
Can I Share Clips Directly to Social Media Platforms From X?
Yes, you can share clips directly to social media platforms from X. Simply select the clip you want to share, choose the social media platform, and click the share button. It's that easy.
Conclusion
So, there you have it, sharing clips has never been easier! Whether you're using YouTube's ‘Clips' feature, testing it yourself, or sharing videos on X, the process is simple and efficient.
Disable viewer clipping if you prefer, but don't miss out on the fun of creating and sharing clips.
From sharing Apple clips to sending video clips on an iPhone, the possibilities are endless.
Get ready to share your favorite moments with the world!


