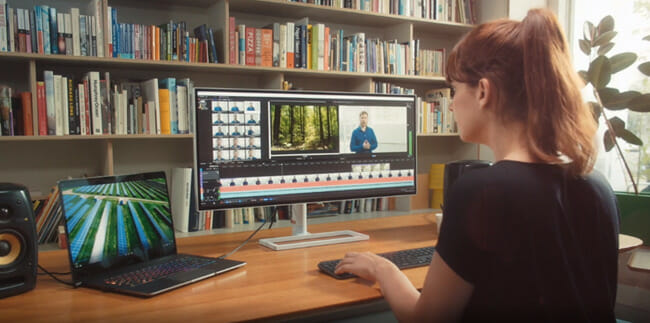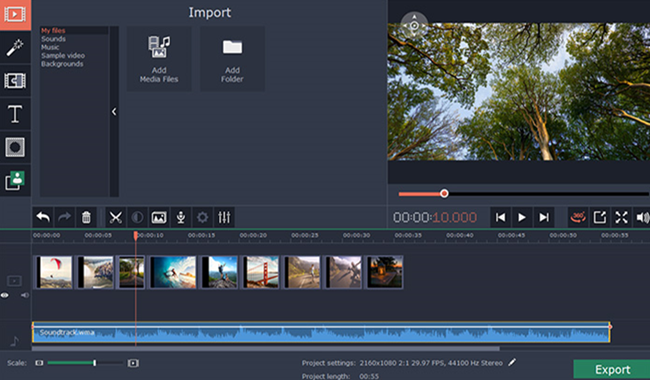
Movavi Video Editor is an easy-to-use video editor for both the Mac and Windows PC. It is meant for both beginners and advanced users due to its wide array of simple, but great features.
It is also easy to work on big and complex video projects with this software because it has a well-designed interface that is equipped with all the functions and controls that you may desire.
Movavi has all the necessary tools that you will require to handle any video editing project. However, there are editions of this video editing software that you need to know about.
Movavi Video Editor comes in the following editions:
- The Standard Video Editor
- Video Editor Plus
- Video Editor Suite
- Movavi Split Movie
- Video Editor for Business
- 360 Video Editor
You may choose any of them depending on your video editing needs.
Related: AVS Video Editor Review
Which Edition of Movavi Video Editor Should You Choose?
This Movavi Video Editor Review will shed more light on the various editions and help you to decide on the one that best suits your needs.
Movavi Video Editor (Standard)
for Mac and Windows
The Standard edition of Movavi Video Editor will let you do all the basic video editing and enhancements that you may require.

How to Use Movavi Video Editor
- Edit and Quickly Share Videos on Social Media
The program allows you to share your videos on all the popular social media platforms.
In this way, you can share your videos with your beloved family and friends.
- Upload Video to YouTube straightaway
Movavi Video Editor makes it easy for you to create, upload, and share videos to YouTube right from inside the program. When you need to post videos on YouTube, a video editor that lets you do that from within the program itself makes it more convenient for you.
- Add Transitions
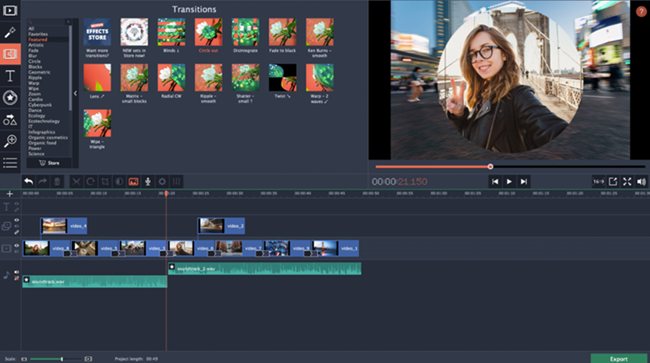
Movavi Video Editor lets you apply video transitions with an array of transition effects for videos to choose from.
Working with Tracks?
With Movavi Video Editor, you can:
- edit multiple tracks
- easily change the order of the tracks
- put clips anywhere on the tracks
- unlink overlay tracks
- have more beautiful and easy timeline navigation
Creating Videos
Creating videos may not be anything new. So, what is special about the way Movavi Video Editor creates videos?
- Drag and drop
Just drag and drop your images, pictures, or videos and your video will automatically get created.
- The videos created can be viewed on 4k TV, PC, and mobile devices.
Some Types of Video that Can Be Created
- Professional Animated videos
- Music Videos
- Collage Videos
- Movies
- Promo Videos
- Slideshow Videos
- Video Clips
- Videos created from photos with added music and effects
- Video Presentations
Video Imports
Videos can be imported from:
- Smartphones
- Cameras
- Hard drives
- and more

Adding Titles
If you are looking for a good movie title maker online, Movavi Video Editor is a good choice as it lets you add titles to the videos you make.
Adding Filters
Many camera filter effects can be applied to the videos you create with Movavi.
Adding Voiceovers
You can add voiceovers to your videos using this software. It comes in handy if you want to:
- record your voice
- make a voiceover presentation
- record musical instruments
Video Stabilization
Quickly stabilize your videos by removing motion distortions and more.
How to Stabilize Videos with Mavavi
- With your video on the timeline, double-click it
- From the Tools menu, choose ‘Stabilization' and click on ‘Stabilize'
- In the settings window that opens, you can use the ‘Accuracy setting' to adjust the precision of the video
- The ‘Shaking slider' can be used to adjust the level of shaking that you can see on the video
- Click ‘Stabilize' to start the process of stabilizing the video
- After the process completes, you can switch between ‘preview' and ‘original' to see how well the video has been stabilized
- Click ‘Apply‘
Combine or Join Videos
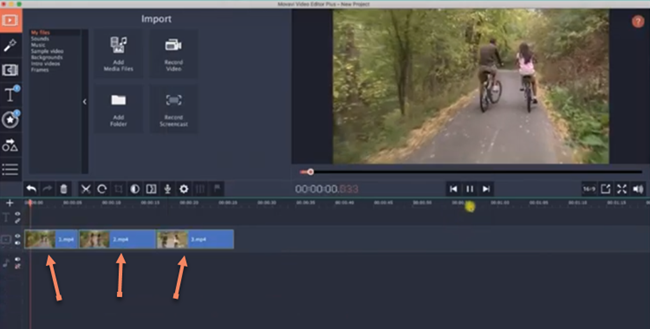
Do you want to combine many videos on one screen? Movavi Video Editor lets you do that.
3 Files Selected to be Combined (Joined)
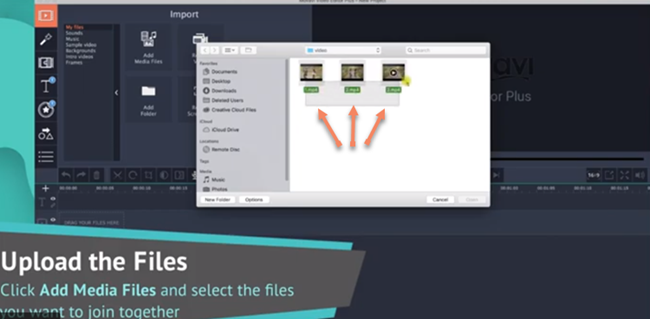
The 3 Files Now Combined on the Timeline (After Clicking ‘Import' or ‘Open')
Audio Adjustment
Some of how you can make adjustments to audio using the program include:
- removing noise
- adding special effects
- make videos match the audio rhythm and speed
Exporting Videos
Exporting videos is fast with support for all the popular file formats.
Movavi Video Editor Plus
for Mac and Windows
Latest Version
Movavi Video Editor Plus contains all the features in the Standard Edition with some added functionalities.

Movavi Video Editor vs Video Editor Plus
The major difference between the Standard Edition of Movavi Video Editor and the Plus Edition is that the Plus Edition has object animation and highlight & conceal in addition to the features in the Standard Edition. The Plus Edition also has more sample video clips, music, and stickers.
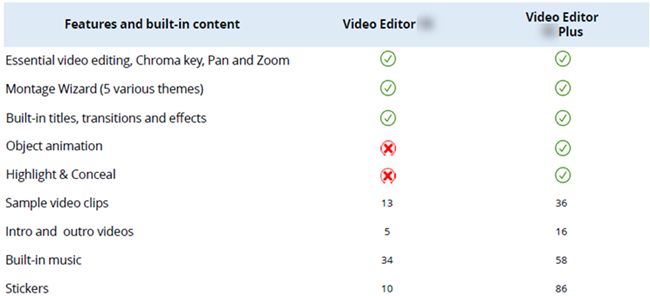
A Closer Look at Movavi Video Editor Plus
With a Movavi Video Editor Plus download, you can, additionally, do the following:
Add Animation
Some of the ways that the Plus Edition lets you add animation or create animation with objects include:
- adding animation to your videos
- adding animation to titles
- adding animation to stickers
- adding animation to callouts
- using animation to make objects fly across the screen
More Music, Videos, and Themed Stickers in the Program's Video Library
In the library of the Plus Edition, you'll find additional:
- music tracks
- video clips
- Themed stickers
Create Movies
With the Plus Edition of Movavi, some of how you can create movies include:
- creating videos with the music of your choice
- adding your videos and photos to the smart montage wizard for automatic video creation
- adding audio to videos
- adding background music to videos
- generally making videos with pictures and music (you can work with photos and music too)
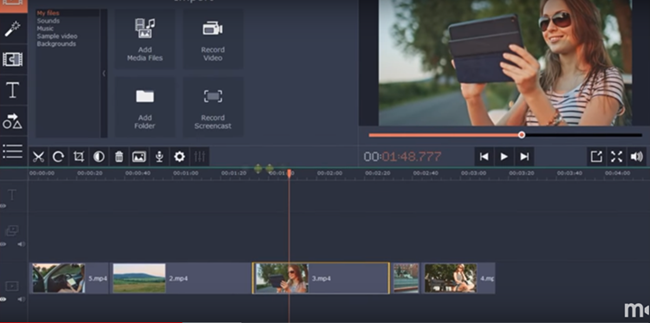
How to Use Movavi Video Maker to Make Movies
- Click on Create Project in full feature mode
- Click on Add Media Files to add your files
- Your files will be added to the timeline automatically
- The files can be dragged around to change their order in the work area
Cut and Trim
Do you need to cut a video? The Movavi Video Editor Plus is about the best video cutter that you can come across.

How to Cut Video and Trim with Movavi Video Editor Plus
You can cut and trim videos in various formats. For instance, you can trim MP4 videos without the need to re-encode.
So, how can you do this?
If the file is in MP4, you can cut it by:
- Clicking the file on the Timeline
- Move the red marker to the position where you want to make the first cut
- Click the scissors icon (which is the split button) or Ctrl+B
To trim video clips, follow these steps:
- Click the file on the timeline to select it
- Shorten it by pulling the edge of the clip
That's it.
Adding Chroma Key Effects
This works in conjunction with the Movavi Video Editor Green Screen.
The type of Chroma Key Effects that you see on TV can be replicated using the Plus Edition of Movavi Video Editor.
Chroma Key is a post-production technique that is used to remove a background from a subject in a video or photo. Different background footage or static images can then be inserted into the screen.
Thus, you can create Chroma Key Backgrounds with the Plus Edition of Movavi Video Editor.
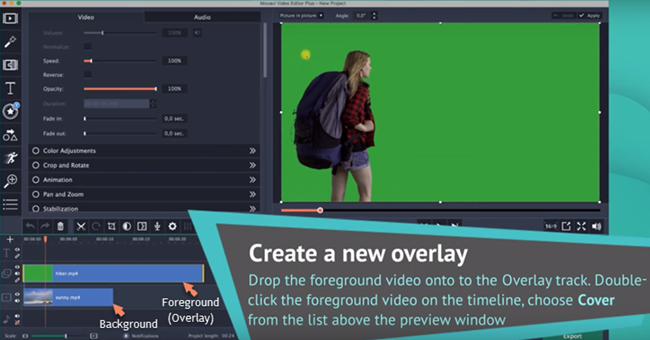

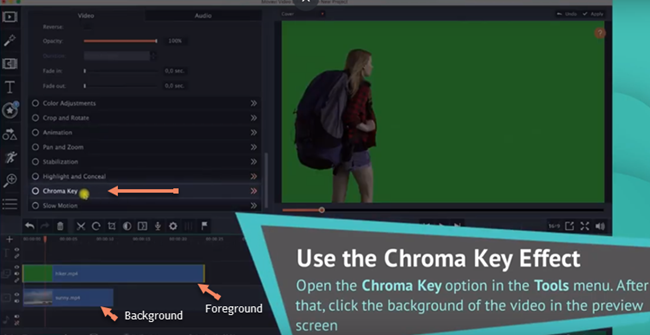
The New Background
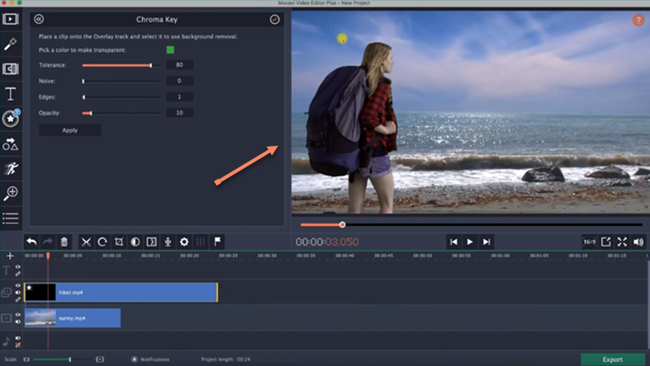
How to Create Effects Using the Chroma Key in Movavi
You can do this by:
- Selecting the foreground video (on the Timeline)
- Drag it up (this will create a new overlay track while the background clip will be left on the main video track)
- On the timeline, double-click the foreground video
- From the list at the top of the preview window, choose ‘Cover'
- Click ‘Apply' to make your foreground image cover your background image
- In the Tools menu, open the Chroma Key option
- In the preview screen, click the background of the video
- The background of your video will now match the little box's color in the Chroma Key menu
- Adjust Opacity, Edges, Noise, and Tolerance to make the background image to become very visible
- Click ‘Apply'
Crop and Rotate Videos
With Movavi Video Editor Plus you can crop your videos by:
- removing unwanted areas from the video that you do not need
- cropping vertical black bars
- changing the aspect ratio
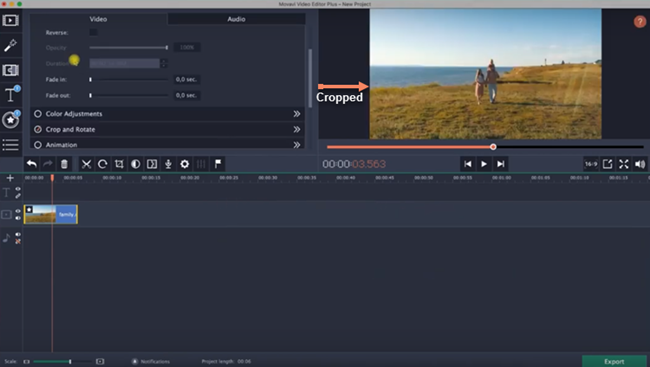
How to Remove Black Bars from Videos with Movavi
METHOD 1
- Download Movavi Video Editor and install
- Click on ‘New Project‘ and click on ‘Add Media Files‘
- Select the video that has black bars
- Remove the black bar by selecting the 16:9 aspect ratio and cropping it
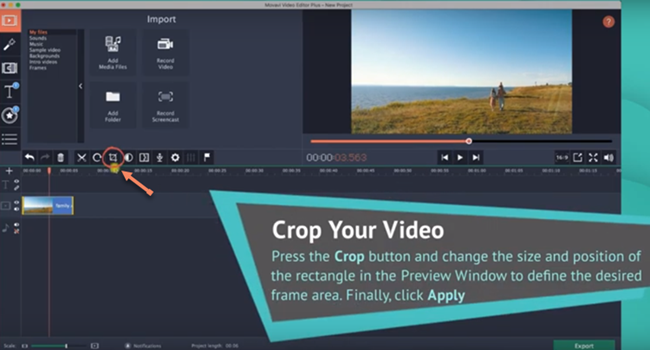
- Click the ‘Crop‘ button
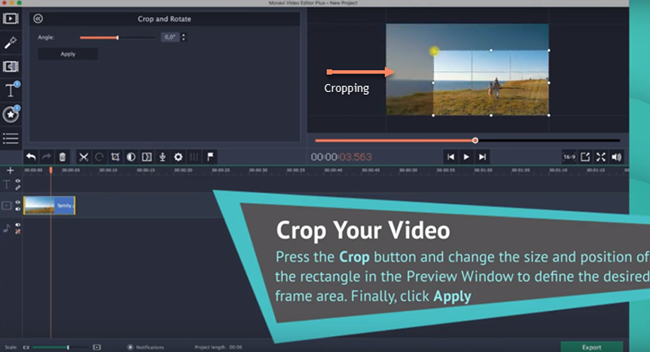
- In the preview window, move the frame to select the part of the video that you want to keep (this will cut off video parts that are outside the frame)
- In the ‘Crop and Rotate‘ tab, click on ‘Apply‘
METHOD 2
- Click on the ‘Filters‘ tab
- In the Adjustments group, locate the ‘Vertical fill‘ filter
- Drag that filter to your video on the timeline
- This removes the black bars in your video
How to Crop Videos with Movavi
- Select the video by clicking on it
- Click on the Crop button (the Crop and Rotate tool opens)
- Define your desired frame area by changing the position and size of the rectangle (in the preview window)
- Click ‘Apply‘
How to Rotate Videos with Movavi
The following are the steps involved in rotating video:
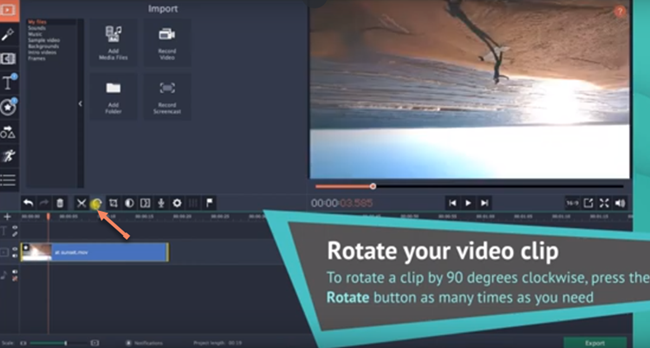
Video rotation can be done in 2 ways:
- 90 degrees clockwise video rotation
(a) Select the video on the timeline
(b) Click on the Rotate button as many times as needed
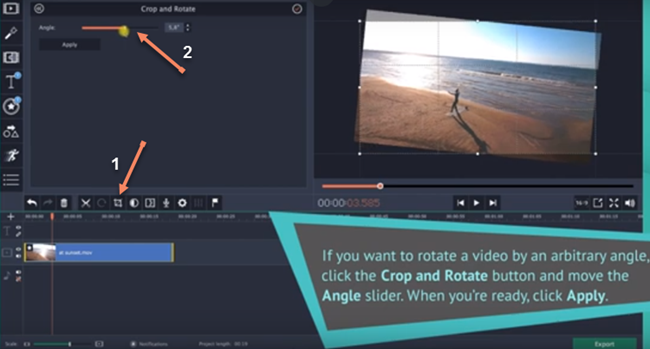
- Arbitrary Angle video rotation
(a) Click on ‘Crop and Rotate'
(b) Move the Angle Slider to rotate the video
NOTE: There is provision for you to enter the rotation angle on the right of the slider
(c) Click ‘Apply‘
The above Movavi Video Editor Plus review is just the tip of the iceberg regarding the capability and ease of use of this software for video editing.
Movavi Video Suite
for Mac and Windows
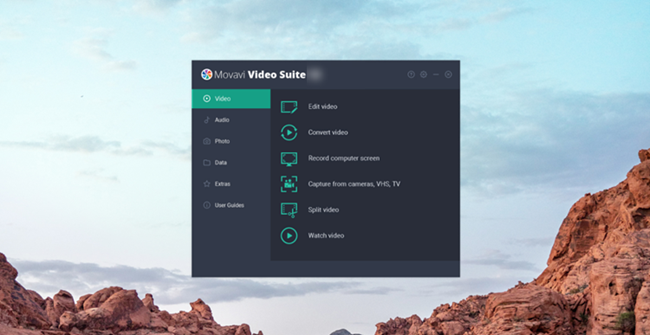
The Movavi Video Suite goes beyond just editing and video enhancements to include other programs like video converter, screen recorder, capture, and media player.
This brief Movavi Video Suite review aims to highlight the functions of this particular edition and how it differs from the other editions of the program
Movavi Video Editor vs Suite
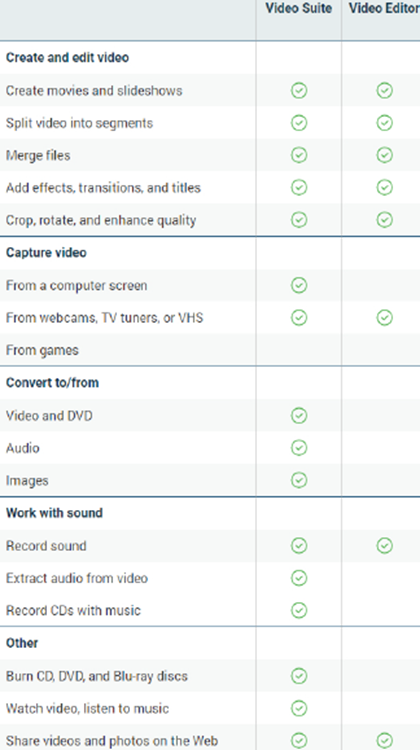
Should you go for Movavi Video Editor or Suite?
What is the difference between the two?
The main difference is that Movavi Video Suite contains other programs that may not be found in both the Standard and Plus Editions of Movavi Video. Some of the additional programs include a media player, video converter, screen recorder, and video capture.
Making Videos
Videos can be made by:
- creating videos from images or pictures and music
- creating slideshow videos
- creating videos for presentation
- creating videos for YouTube upload
- creating movies
- creating music videos
- adding effects to videos
- making collage videos
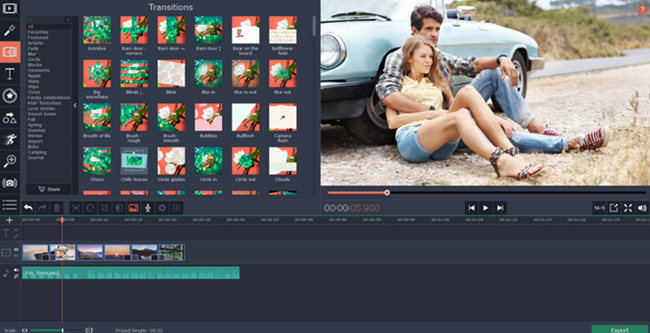
Video Transitions
You can create:
- slide transitions
- add other transition effects for videos
Video Titles
The Movavi Video Suite lets you add titles and subtitles to videos.
How to Add Subtitles to Videos with Movavi
You can add titles and subtitles to videos by following these steps:
- Click on the Titles tab (this will list out the available caption styles that you can use for your subtitles)
- TIP: You can click on their respective icons to preview each of them in the media player window
- Drag your chosen style to the timeline (you can adjust their positions by moving them around)
- Double-click the title that you have put in the timeline and paste or type your text by double-clicking the sample text in the preview window
- To make it legible, move the caption along the video frame
Video Effects
Easily add transition effects to slideshows and videos.
The above (and more) are what you'll get with the Movavi Video Suite download.
Movavi Split Movie
for Windows & Mac
This one is made for Windows and Mac users. The Movavi Split Movie for Mac and Windows is software designed for the simple manipulation of videos. It can be found in the Movavi Video Editor.

With this, you can edit video footage by trimming and splitting videos of any format into frames.
All popular video formats like AVI and MP4 can be split.
Not only can you trim, cut, and split videos and scenes, but you'll also be able to join different videos together.
What Makes Movavi Split Movie Unique?
- Original video quality is maintained even after processing (no post-conversion, no re-encoding)
- Up to 20x faster video cutting
How to Split Videos with Movavi
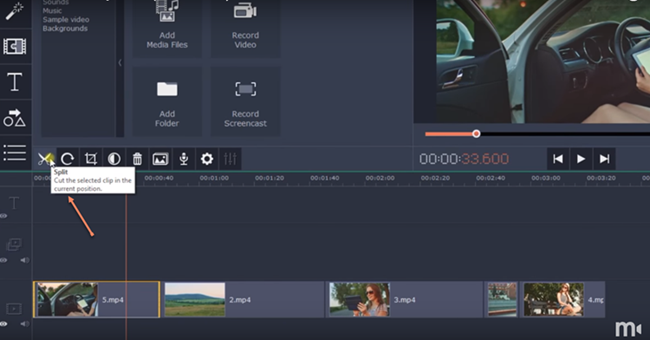
- Play the movie in the preview window for you to locate the unwanted area that you want to cut
- Place the red marker at the beginning of the unwanted area
- Click on ‘Split‘
- Again, place the red marker at the end of the unwanted area
- Click on ‘Split‘
- The unwanted part of the video will now be cut out or separated from the rest of the video
- You may now click on ‘Delete‘ to remove the unwanted part of the video
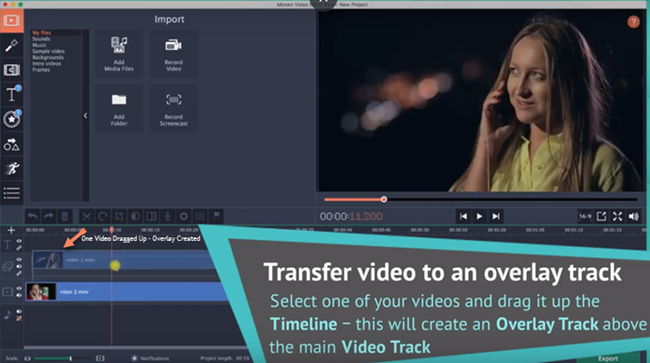
How to Make a Split-screen Video with Movavi (Putting Two Videos Side by Side)
- Drag one of the two videos to the timeline
- This will create an Overlay Track on top of the main Video Track
- Put that video in the Overlay Track
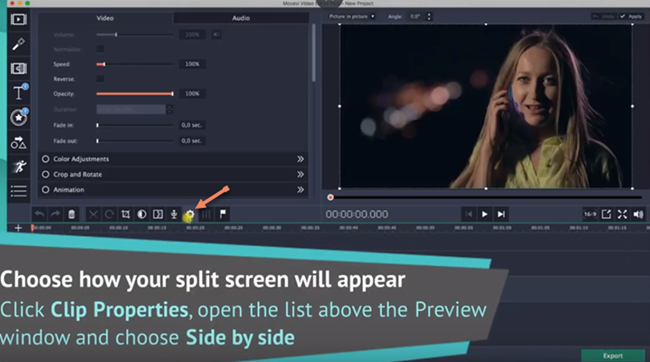
- Double-click the video in the Overlay Track (the one on top) to start editing
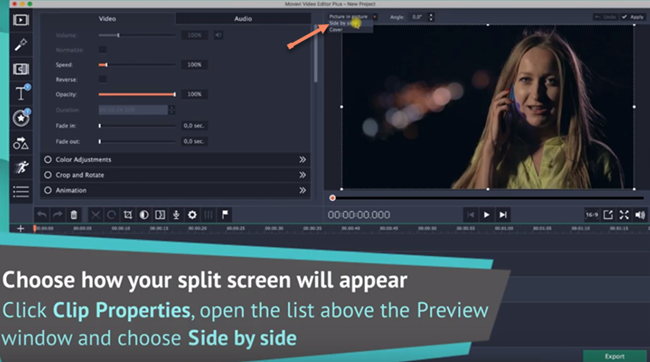
- From the list on the top of the Preview window, choose ‘Side by Side'
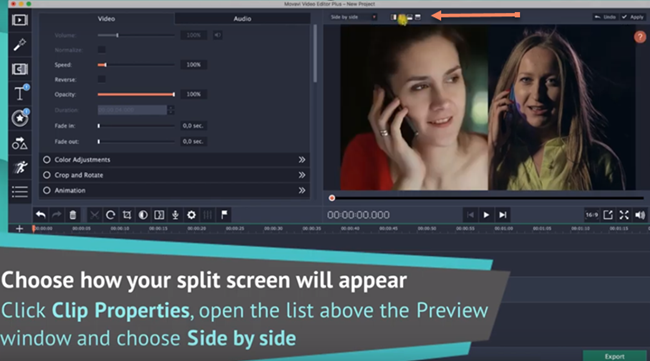
- With any of the four buttons next to the list, choose the part of the screen where you want each of the two videos to play. For example, one can play on the right of the screen and the other on the left of your screen
- The screen can be split in half vertically or horizontally
- Click on ‘Apply‘
Movavi Video Editor Business
for Mac and Windows
Movavi Video Editor Business is ideal for people who need to create tutorial videos, presentations, or market products or services with videos.

Movavi Video Editor Business vs Plus
The main difference between the Business Edition of Movavi Video Editor and Plus Edition is that the content of the Business Edition is business-themed and can record screens of video calls and more. It also has more sample videos, music, stickers, and backgrounds and can be used on 2 computers.
It has all you need for all the above and more as you'll get to see in this Movavi Video Editor Business review. The ability to add watermarks, callouts, and titles are just a few of them.
Also, apply any audio-visual effects you need like:
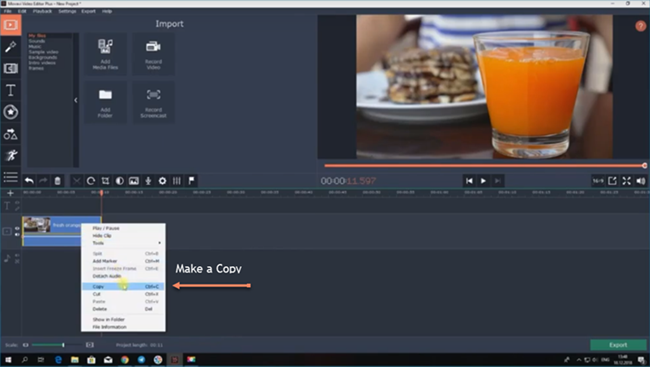
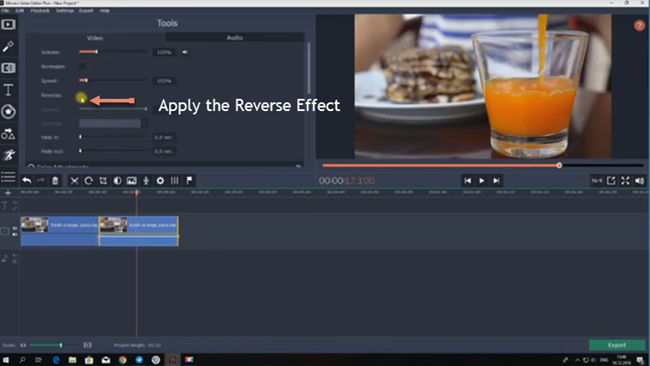
- reverse video
- chroma key effect
- slow motion
- and more
How to Reverse Videos with Movavi
- On the timeline, click on the file
- Click on the cogwheel (Clip properties)
- In the checkbox of the Tools tab, select Reverse
How to Add Watermarks or Logos to Videos with Movavi
- Install the Business Edition of Movavi Video Editor
- It is better to make sure the images you plan to use are transparent rather than opaque (both static and animated images can be used)
- Add the watermark or logo file to the timeline
- Drag the file up so that a new Overlay Track will appear
- Put the file in the Overlay Track so that it appears on top of the video
- Drag the right edge of the image clip until it reaches the end of the lower video if you want your logo to appear throughout the video
- Click on ‘Apply‘
Related: How to Remove Watermarks from Videos
Videos that You Can Create with the Business Edition
- educational videos
- videos for learning
- instructional videos
- video presentations
- tutorial videos
- videos for teachers
- animated educational videos
- videos to showcase products or services
To efficiently achieve all of the above, Movavi Video Editor for Business is equipped with the ability to:
- add captions to videos
- add arrows
- add callouts
- add commentary and soundtracks to videos
- add video effects (reverse, slow motion, chroma key, and more)
- record demo videos
- record screen activity (like webcam videos and audio)
- record videos that show mouse and keyboard actions
- remove unwanted footage
- add transitions
- add filters to liven your videos (about 160+ filters)
- upload videos to YouTube, Vimeo, Google Drive, and Movavi Cloud quickly
- add voiceover to videos.
How to Record Webcam Video with Movavi
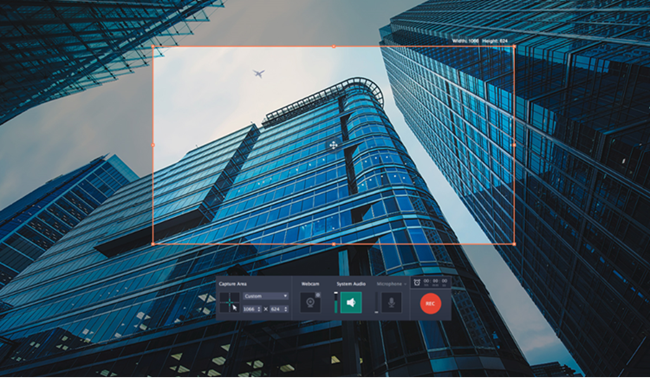
- Look for the ‘Record Video' button in the Editor window
- Click on ‘Record Video‘
- A special app for video capture will appear
- To save your file in a location of your choice, choose where you want the file to be saved in the ‘Save files to‘ field; otherwise, the file will be saved in Movavi Library by default
- Click on ‘Start Capture‘ to start the recording
- Click on ‘Stop Capture‘ to stop the recording
- To open and playback the saved recording, click on ‘View saved files‘
Movavi 360 Video Editor
for Windows
NOTE: Movavi 360 Video Editor may no longer be available or supported.
Movavi 360 Video Editor used to be one of the latest offerings from Movavi Video Studio.

What are 360-degree Videos?
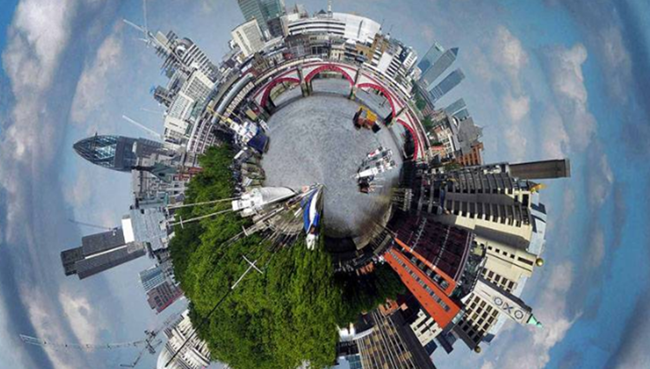
360-degree videos are recorded at the same time with shots from an omnidirectional camera that has multiple lenses or a collection of cameras to create a panoramic viewing experience for the viewer.

These videos are immersive and are also called spherical videos. They are usually achieved through a process known as video stitching whereby the simultaneously filmed angles are merged to become a spherical video.
Movavi 360 Video Editor was a software that provides you with all you will need for 360-degree video editing.
In this Movavi 360 Video Editor review, we'll take a look at some of the things that this program was capable of doing.
Some Things You Can Do with Movavi 360
Create 360 Videos
This used to be a handy 360-degree video maker that let you quickly create this type of video and 3d tour on its handy timeline.
Make VR (Virtual Reality) Videos
If you were looking for how to make VR videos, Movavi 360 would have done the job.
Importing, Uploading, and Sharing of Videos
- You can upload videos for sharing to YouTube and others
- Import or upload videos from 360-degree cameras
- You can upload high-resolution videos of up to 4k
Adding Filters
360-degree video editor by Movavi was fortified with amazing filters. If you needed camera filter effects, this program provided more than enough filters for your video editing.

Adding Soundtracks
Record sound or simply add soundtracks from:
- your voice
- musical instruments
- the built-in library within the program itself
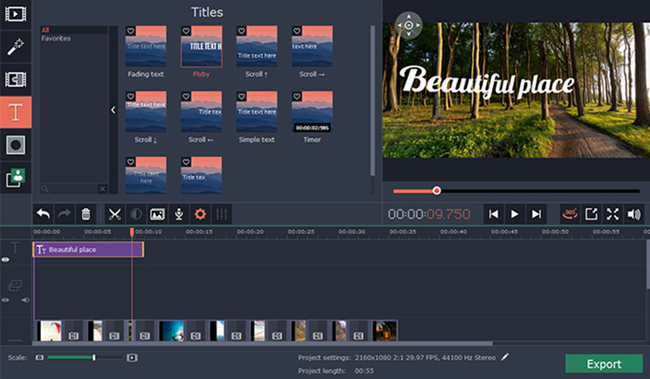
Adding Titles
Are you in need of an application that lets you add subtitles to videos or a movie title maker? Movavi 360 was built to handle all these tasks efficiently.
Adding Transitions
You can add transition effects for videos such as animated, slide transitions, and many more.
Trim and Cut Footage
This was a video trimmer that lets you remove unwanted parts from any 360-degree video.
Improve Image Quality
It can help you to improve the quality of images on videos.
Adding Texts and Overlays
You can add texts and overlay texts to videos with Movavi 360.
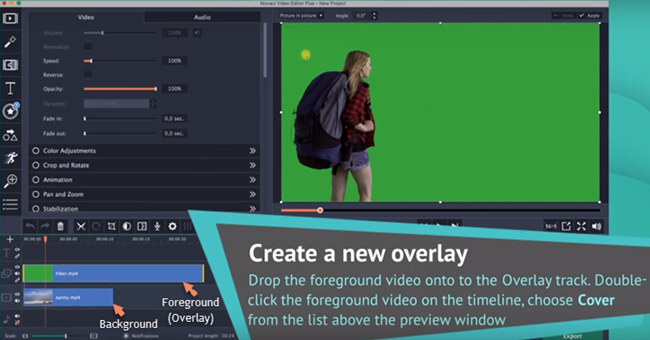
How to Overlay Videos with Movavi
- For your overlay track to appear, select your video (the one that you want to put on top of the background clip) and drag it to be on top of the Video Track
- You will see your foreground video covering a part of the background video
Adding Music
You can add music to videos, create slideshows with music, and more in any format (FLAC, OGG, WMA, MP3 audio added to AVI, MP4, or other audio-visual formats).
How to Add Music to A Video Using Movavi
- Click Add Media Files
- Upload video and audio files that you want to combine (video files will sit on the Video Track while audio files will sit on the Audio Track with the musical note symbol).
- Move the red marker to the video and audio's end and click on the Split button if the music file is longer than the video file.
- Duplicate the audio and place the copied files beside each other on the same track if the video is longer than the music track.
Exporting the Videos
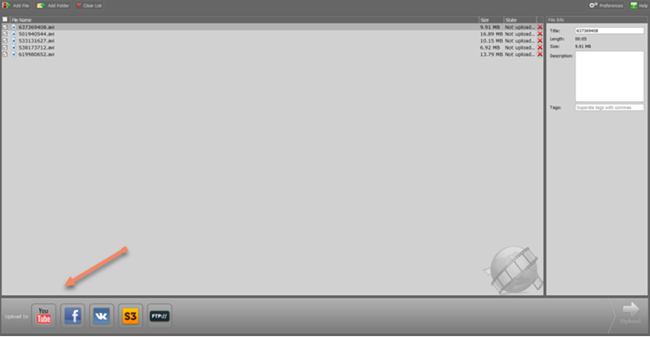
Videos can be exported to:
- PCs
- Mobile phones
- uploaded to Youtube
- or shared on social media
Changing Video Backgrounds
With the Chroma Key effect of Movavi 360, the background of videos can be changed to almost anything you want.
Removing Background Noise
Background noise can be removed from:
- audios
- videos
Adjusting Color
Adjust color brightness and more either manually or automatically.
Video Effects
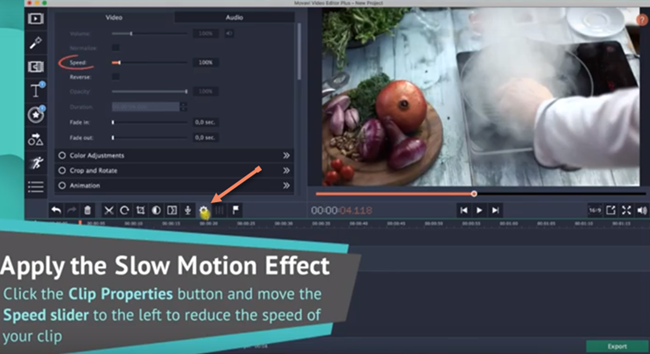
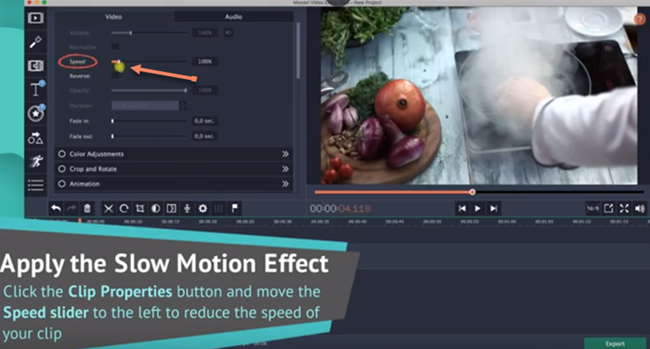
You can add a variety of video effects as needed. Using the Movavi Video Suite or Business, you can speed up a video or adjust it to play in slow motion.
It is even possible to blur parts of your videos.
How to Speed Up Videos with Movavi
- Click on Clip Properties
- Adjust the speed-up rate by moving the Speed slider to the right
Installation and Setup
To Install Movavi Video Editor, just download the program to your Mac or PC, run the file, and follow the instructions shown on the screen.
Compatibility
WINDOWS PC
- Windows XP
- Windows Vista
- Windows 7
- Windows 8
- Windows 10
- Windows 11
MAC
- Mac OS X 10.15 or higher
Is it Free?
Yes and No.
Even though Movavi Video Editor is free to download, the trial version may not contain all that you'll need for your video editing project(s) (which you'll get in the full version with a license). However, it can still be a good starting point to know how the program works.
How Much is Movavi Video Editor?
The Movavi Video Editor price is quite reasonable and has a higher value to the user compared to the cost of buying the software. The price starts at $19.95 depending on the edition you choose to go for and has a free trial version for you to test.
1-month plan
- Video Editor – $19.95 per month.
1-year plans
- Video Editor Plus – $178.95.
- Video Suite Plus – $250.95.

Lifetime Plan
- Video Editor Plus – $222.95.

Conclusion
Movavi Video Editor can be used by beginners, intermediate and advanced users. It is loaded with all the necessary tools you'll need to churn out beautiful and impressive videos.
Movavi Video Editor (Suite or Business) is all you need to make educational videos, tutorials, promotional videos, and movies, add special effects, improve video quality, cut, join videos together, upload, share your videos, and more.
